App Build Settings
Common for app and website#
App Name#
Name of your application.
Website URL#
The url of the website. Make sure you are the owner of the domain mentioned here.
App Icon#
Upload 1024x1024px png icon of app.
Monochrome App Icon#
Upload 256x256px png monochrome icon of app.
This icon is used in app notifications.
Firebase Project Id#
This can be obtained from Firebase Project Settings page.
Google Analytics Property Id#
Google analytics Property Id can be obtained from Google analytics Admin -> Property Settings page
Dynamic Links Domain#
Create new dynamic link domain in Firebase and fill it here. This is needed before app is published.
Theme#
Select primary, secondary and tertiary color of brand.
If there is text on element with backgroud color from any of above three colors, then color of text will be their contrast color.
For example:
If backgroud color of header is primary color, then text in header will be primary contrast color.
Font Family#
Select from available list of font family that is suitable for brand.
Other#
In order for Apple and Google to permit deep links to open your app, a two-way association between your website and app must be created. One file for each must be created and placed within a .well-known folder on your website, like so: https://beerswift.app/.well-known/.
Universal Deeplink Android#
The Site Association file requires the SHA256 fingerprint of your Android certificate.
If you have enabled automatic signing in the Google Play Store, you can get your SHA256 certificate by going to https://play.google.com/console, selecting your app, Setup, App Signing, and copying your SHA256 app signing certificate thumbprint.
If you have not signed your app or enabled automatic signing and do not already have a certificate, you can create a new certificate:
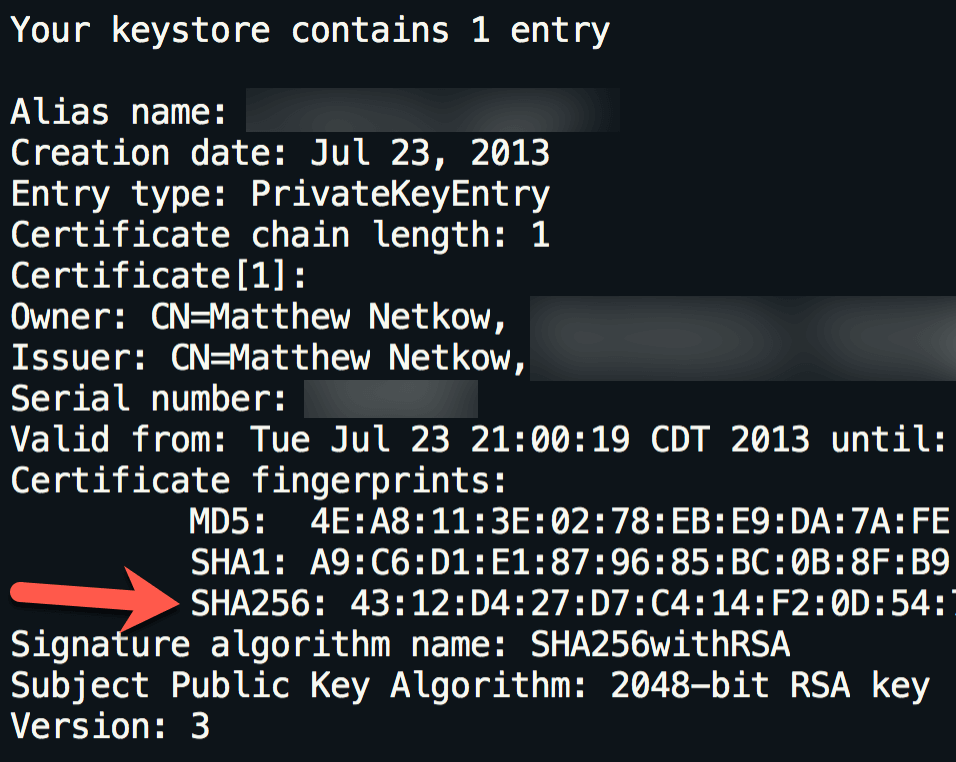
keytool -genkey -v -keystore KEY-NAME.keystore -alias ALIAS -keyalg RSA -keysize 2048 -validity 10000Using your existing (or newly created) Keystore certificate, use the keytool command to list the keystore’s details:
keytool -list -v -keystore my-release-key.keystoreThe printed output will include the SHA256 fingerprint:
Next, use Google’s Asset Links tool to create the Site Association file. Fill in the website domain, app package name, and SHA256 fingerprint, then click “Generate statement”:
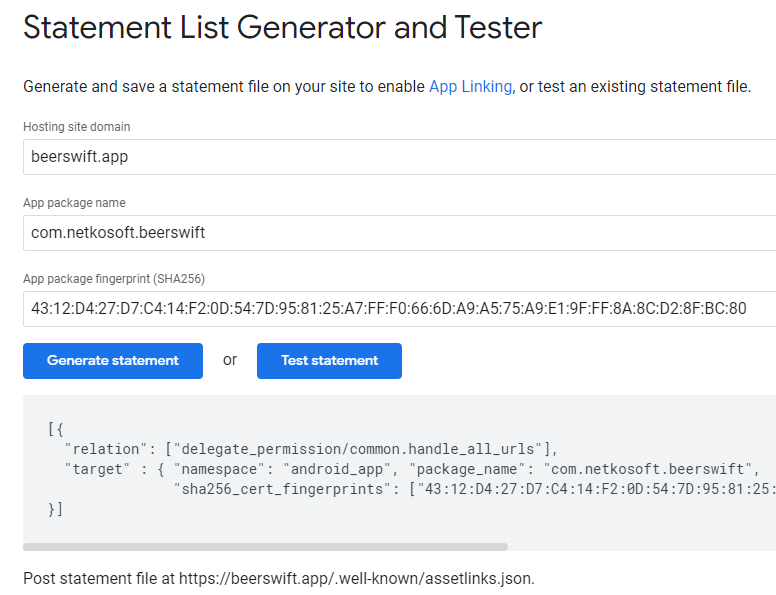
Copy the JSON output into a new local file assetlinks.json
// assetlinks.json[ { "relation": ["delegate_permission/common.handle_all_urls"], "target": { "namespace": "android_app", "package_name": "com.netkosoft.beerswift", "sha256_cert_fingerprints": ["43:12:D4:27:D7:C4:14..."] } }]Universal Deeplink IOS#
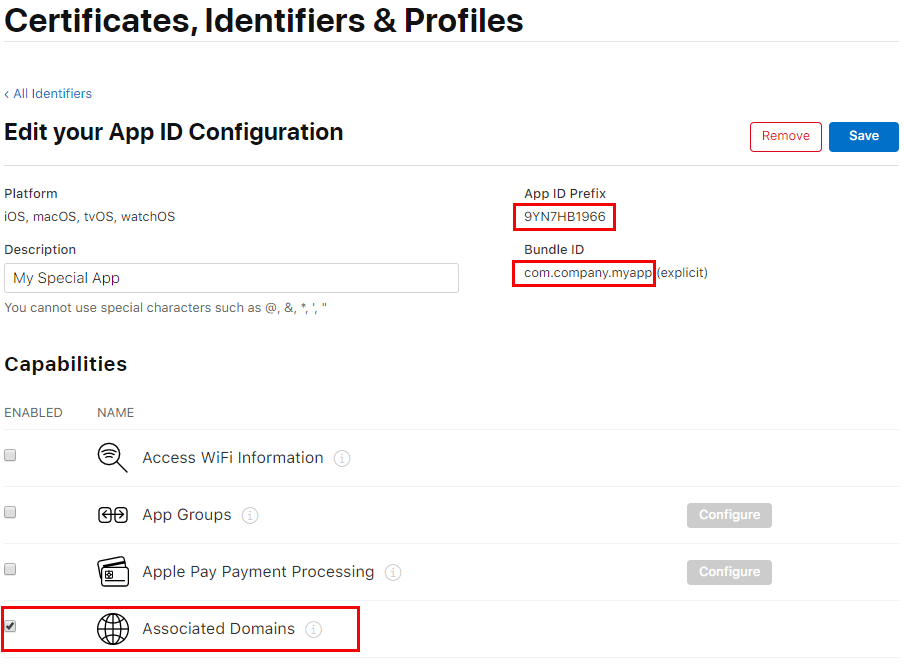
First, log into the Apple Developer site. Navigate to the Certificates, Identifiers, & Profiles section and select your app’s identifier.
Note the Team ID and Bundle ID, and under Capabilities, toggle Associated Domains then save:
Next, create the site association file (apple-app-site-association)
An example of the apple-app-site-association file is below. Be sure to replace TEAMID.BUNDLEID with your own IDs (example: 8L65AZE66A.com.netkosoft.beerswift).
{ "applinks": { "apps": [], "details": [ { "appID": "TEAMID.BUNDLEID", "paths": ["*"] } ] }}Android#
Additional information are required to publish Android app.
Package Id#
This is id of your app on play store and has to be unique.
Pattern must be com.your_business_name.autiller.
Example - com.mybusiness.autiller
Version code#
This determines version number of your app and should always be higher that active version on play store.
App signing#
Following details are required for signing your app before publishing them to play store.
- Keystore file
- Keystore password
- Key alias
- Key password
Contact our support team to get these credenials. Or you can can obtain a new one by executing below command in Terminal app.
keytool -genkey -v -keystore <FILE_NAME>.keystore -alias <KEY_ALIAS> -keyalg RSA -keysize 2048 -validity 10000caution
Do not share these details insecurely. These are required to publish subsequent updates of your app. Keep them in safe place. If you loose them, you won't be able to upload new updates.
Service account file#
Create a service account which has access to publish apps to play store through api. Follow below steps to obtain service account file.
- Open the Google Play Console
- Click the Settings menu entry, followed by API access
- Click the CREATE SERVICE ACCOUNT button
- Follow the Google Developers Console link in the dialog, which opens a new tab/window:
- Click the CREATE SERVICE ACCOUNT button at the top of the Google Developers Console
- Provide a
Service account name - Click Select a role and choose Service Accounts > Service Account User
- Check the Furnish a new private key checkbox
- Make sure JSON is selected as the Key type
- Click SAVE to close the dialog
- Make a note of the file name of the JSON file downloaded to your computer
- Back on the Google Play Console, click DONE to close the dialog
- Click on Grant Access for the newly added service account
- Choose Release Manager (or alternatively Project Lead) from the Role dropdown. (Note that choosing Release Manager grants access to the production track and all other tracks. Choosing Project Lead grants access to update all tracks except the production track.)
- Click ADD USER to close the dialog
Upload this JSON file in Service account field in App Build Settings > Android in Business Settings.
caution
Consider this file as password to login and push updates to play store through api, Keep it in safe place.
Firebase auth file (google-services.json)#
This section will guide you to obtain google_service.json, required for App notifications and Firebase and Google analytics.
Creating a Project for your App on Firebase#
- Go to the Firebase Console and click the Add project button.
- Name the project, accept the Firebase ToS and click Create project to continue. A Project ID should be automatically generated for you.
Integrating Firebase with the Android app#
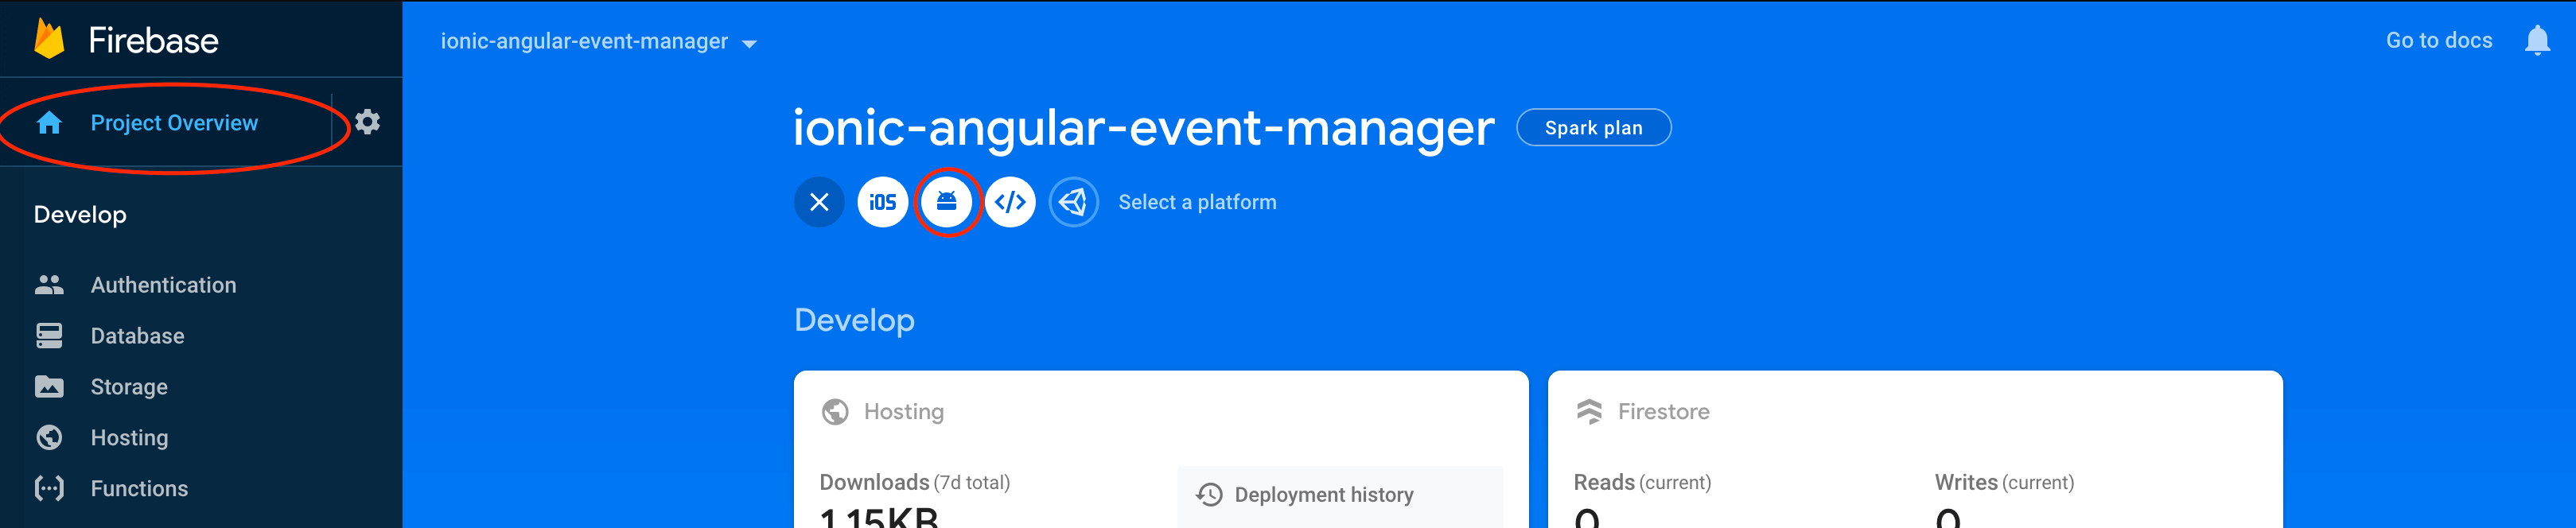
- Go to the Project Overview page of your Firebase project and at the top, click on the Android icon to add a new android application.
- The next screen will ask you for some information about your application.
- Your Android package name should match the package id explained in section Package Id.
- Nickname and Debug Signing Certificate are optional.
Then click the Register app button.
Download the google-services.json file and upload it in Firebase auth file (google-services.json) field in App Build Settings > Android in Business Settings section.
Analytics Enabled#
Enable/Disbaled Analytics in Android app.
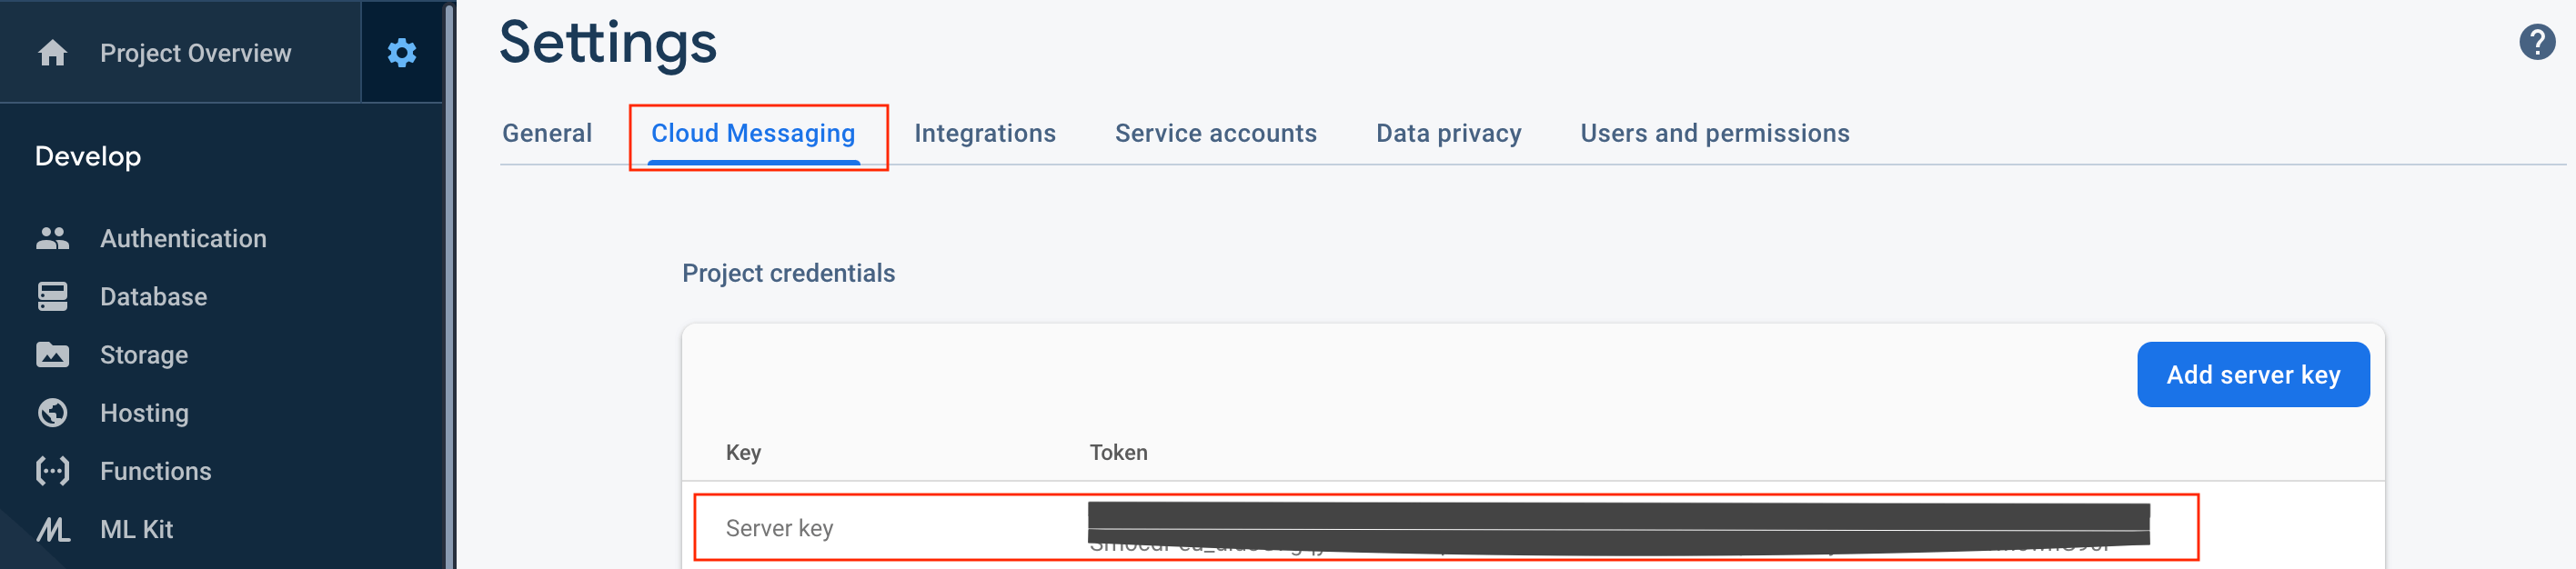
GCM Key#
GCM key is required to send notification from our servers.
Before proceeding further please obtain google-services.json file described in google-services.json.
Once you have google-services.json , follow below steps to obtain GCM key.
- Click on ⚙️ and then on Project settings

- Click on Cloud Messaging tab and copy the Server key token.
Play store url#
To get play store url of app, simply copy the url of app in play store.
IOS#
Register app in Apple developer portal#
Register a new identifier at https://developer.apple.com/account/resources/identifiers/list
- Select option
Identifiersfrom left Menu and click on+icon. - Select option
App IDsfrom the list. - Select type
App. - Add description and unique bundle Id, e.g. com.example.autiller. Select option
Push NotificationsandAssoicated Domainsin Capabilities list. - Review and click on
Register.
- Select option
Add new app at https://appstoreconnect.apple.com/
- Select
My Appsoption. - Click on
+icon and select optionNew App. - Fill in the details, selecting language
English (US)
- Select
Package Id#
This is id of your app on app store and has to be unique.
Pattern must be com.your_business_name.autiller.
Example - com.mybusiness.autiller
Team Id#
Get Team id from app developer portal.
Team Name#
Get Team Name from app developer portal.
Version code#
This determines version number of your app and should always be higher that active version on app store.
Appstore review notes#
This is required for app store review.
Firebase Auth (GoogleService-Info.plist)#
This section will guide you to obtain GoogleService-Info.plist, required for App notifications and Firebase and Google analytics.
Select the project created previously for android.
Integrating Firebase with the Android app#
- Go to the Project Overview page of your Firebase project and at the top, click on the iOS icon to add a new ios application.
- The next screen will ask you for some information about your application.
- Your iOS bundle id should match the package id explained in section Package Id.
- Nickname and Debug Signing Certificate are optional.
Then click the Register app button.
Download the GoogleService-Info.plist file and upload it in Firebase Auth (GoogleService-Info.plist) field in App Build Settings > IOS in Business Settings section.
Auth key(for notification and deeplink)#
Add content of .p8 file
Auth key Id#
Get app key file from Apple developer portal.
Analytics Enabled#
Enable/Disbaled Analytics in iOS app.
App store url#
To get app store url of app, simply copy the url of app in app store.
Web App#
Firebase Auth (SDK snippet)#
- Go to the Project Overview page of your Firebase project and at the top, click on the Web icon to add a new web application.
- The next screen will ask you for some information about your application.
- Enter nickname of app, same as business name.
Then click the Register app button.
Copy the Firebase SDK snippet and paste it in Firebase Auth (SDK snippet) field in App Build Settings > Web app in Business Settings section.
Facebook pixel id#
Facebook ads tracking pixel id only for website.
GTM id (Google ads tag id)#
Google ads tracking pixel id only for website.
Analytics Enabled#
Enable/Disbaled Analytics in Web app.